
DocuWare 101
Table of Contents (Control + click hyperlink to go directly to section)
Main Window Overview
General overview of DocuWare’s main window
Menu Bar Overview
File, Edit, Store, Options, Window, ?
Tool Bar Overview
Staple, Un-staple, Display windows, Trash Can
Baskets
Baskets, use, page count, moving documents, refreshing basket
Storing documents
File types, importing documents to store, Store Dialog options
Searching for documents
Key identifiers, Wildcard search, date range searching
Creating Microsoft Excel reports with the Results List
How to create Excel reports with the Results List
Understanding the Results List
Overview of the Results List, New Search, Nested Search, Printing the Results List, Modifying
indices using the InfoBox, Exporting documents to file, Appending documents to existing
records.
Understanding the DocuWare Viewer
Searching for keywords in a document, Zooming in/out, Displaying full width, Rotating pages,
Inverting image, Printing, Emailing, Push Pin notes
Additional Tools in the DocuWare Viewer
Annotating, moving annotations, highlighting, overlay levels
Stamps
Public vs. Private stamps, dynamic stamps that update index fields when placed
Shortcuts
DocuWare Web Client
Web Client overview, working away from your desktop computer, VPN access requirements for
off campus access, Emailing documents in PDF format
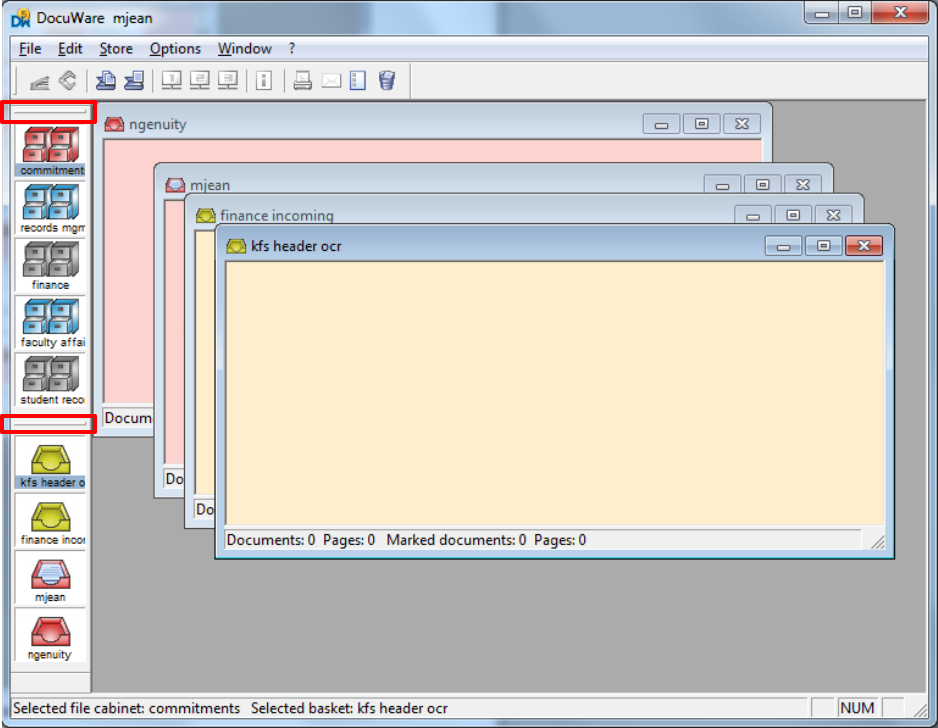
Main Window Overview
• DocuWare main window: On the left you will see all open baskets and file cabinets. You can
change the appearance of your DocuWare window by clicking the bar just above your basket or
file cabinets and drag the basket or file cabinet toolbar to other areas of your window.
Menu bar overview
In DocuWare, you have a variety of ways to accomplish the same task. You may like to use keyboard
shortcuts or you may prefer navigating through menu choices, or even using ‘right-click commands’ to
accomplish the task at hand. Many of the options found in the Menu bar have the keyboard shortcuts
to the right of the command so you can become familiar with these as you begin to use the system
more. You’ll find that a majority of your tasks will not require many of the options available to you
within the Menu bar.
• File
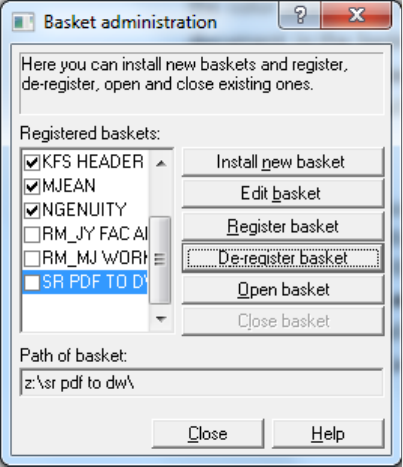
o Basket administration...
Here you can define all settings pertaining to baskets (Creating a new basket, changing
the color of a basket or selecting another recognition configuration for indexing the
document in the basket).
Basket administration
Install/edit/register
o File cabinet administration...
Here you can define all settings pertaining to DocuWare 4 mode file cabinets
(Creating a new file cabinet or changing the settings of an existing file cabinet).
File cabinet administration
Install/edit/register
Access to file cabinets is based on your user permissions set by
your job function and management team. Getting access to
additional file cabinets requires an email from the supervisor
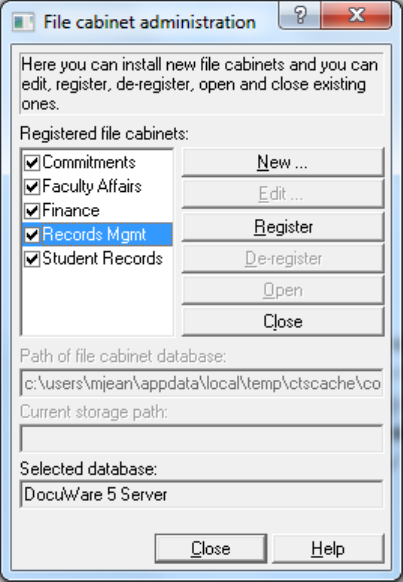
over that unit specifying to COM-IT Records Management what
access level is required. Or, the manager of that area can
request file cabinet access through a Help Desk to COM-IT,
which will be forwarded to the Records Management staff.
Baskets and cabinets have the tendency to unregister from time
if your computer has connectivity issues to the server. You will
typically notice this upon login and will need to go into the
Basket and Cabinet administration periodically and reselect
your baskets and cabinets by clicking in the unchecked boxes for
your available file cabinets or baskets.
• Edit
o Under the Edit menu, you will find a variety of options available to you. As mentioned
above in the Menu bar overview, many of these options can be also be accomplished by
right-clicking, using the toolbar, or using shortcuts.
o The Edit menu will display different options depending on whether you currently have a
file cabinet or basket selected (highlighted). We will cover the Edit menu in training and
look over some of the options you will most likely use.

• Search
o When you have a cabinet properly selected, the name of the cabinet will be
highlighted in light blue as seen in the example below. Only when you have a
cabinet selected will the ‘Search’ option be available in the Menu toolbar.
NOTE: If you do not have a cabinet selected in ‘File Cabinet
Administration’ the ‘Search’ option will not display on your toolbar.
o You can also bring up the Search dialogue menu by double-clicking on file
cabinet you wish to search.
• Options
o Under Options you will find a variety of different options to choose from
although you probably won’t access this menu much unless you prefer to turn
on/off certain toolbars available to you in the DocuWare window.
• Window
o This is another avenue into your DW trash can.
o How you want to view your open baskets within DocuWare, such as tile or
cascading.
o Allowing you to select which baskets and file cabinets you currently want active.
o SVGA… (Ctrl+F5) to open the Window Positions which you have selected and
stored or those set to default for a screen resolution of 800x600 pixels.
o XGA… (Ctrl+F6)… to open the Window Positions which you have selected and
stored or those set to default for a screen resolution of 1024x786 pixels.
o SXGA… (Ctrl+F7)… to open the Window Positions which you have selected and
stored or those set to default for a screen resolution of 1280x1024 pixels.
Although you have different monitor configurations available to you
here, your default settings will likely suffice unless you use multiple
devices such as your desktop scanner and a laptop.
• ? (Help menu)
o This is your Help Information resource center where you can research the
functionality of DocuWare and its components. This is a full scale user manual
available to you outside of this instructional document.
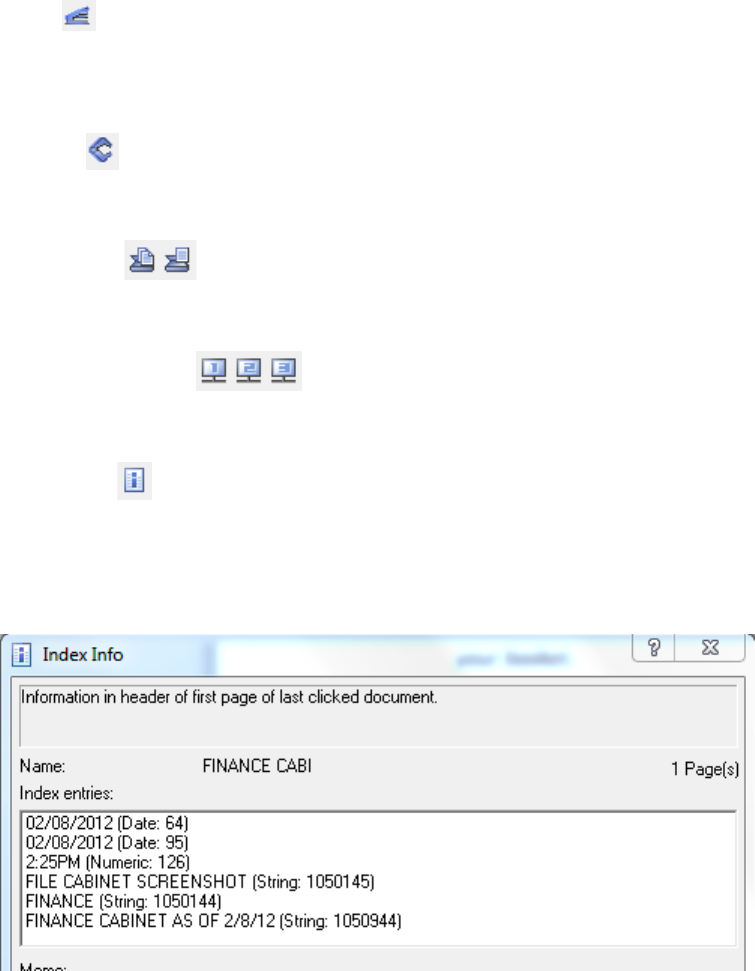
Toolbar overview (
under the Menu options)
• Staple
Used for stapling multiple documents together in your basket.
• Unstaple
Used for unstapling a document in your basket.
• Scan Options
Unused unless you are using a desktop scanner to scan documents into DocuWare.
• Display Windows 1-3
Allows opening of multiple documents from your basket in multiple viewers for comparison.
• i –index info
Allows you to see all associated metadata that was indexed on the selected document. Also
allows you to update any incorrect metadata in index fields and as well as allow you to see the
store date and time of a document exported from a cabinet to your basket.

• Direct Print
Will send your document directly to your default printer.
• Send…
By selecting this option a copy of the document you currently have selected in your basket will
invoke the command of opening a new outgoing email in Microsoft Outlook with the document
attached. Keep in mind that the format of the document will be the same format in which it was
stored into the system. Most documents that are scanned in our office are TIFF format and may
present difficulties opening by the recipient of the email. By using the Web Client to perform
this function the email attachment will always attach as a PDF, which is a more universally
recognized format.
• Pending box…
This option will show any documents currently within your Pending box. To place a document in
the Pending box, you have to invoke the command of sending a document from the Results List
to the (To Pending box… ). To do so, select the document(s) in the Results List and click on the
icon .
Once you place a document into your Pending box, your icon will change from to to
signal that you currently have pending documents to review.
Adding documents to your Pending box creates a ‘copy’ of the source document and places it
into your Pending box and will not flag the document in the Results List. If you choose to use
the Pending box, do not store the copy of the document from the Pending box as this will create
multiple copies of the document in the file cabinet and create confusion about the original store
date of the document.
After opening your Pending box you will see all documents currently pending. By selecting a
document using a single-click, you will see the Date field and the document Name field. The
Date field is the original store date that you will use to access the source document for
processing or editing and the Name field will provide you with the name of the document (see
below). The Pending box should only serve as a reference reminder to identify documents that
need further review for processing or editing. Once you’ve performed the necessary action on a
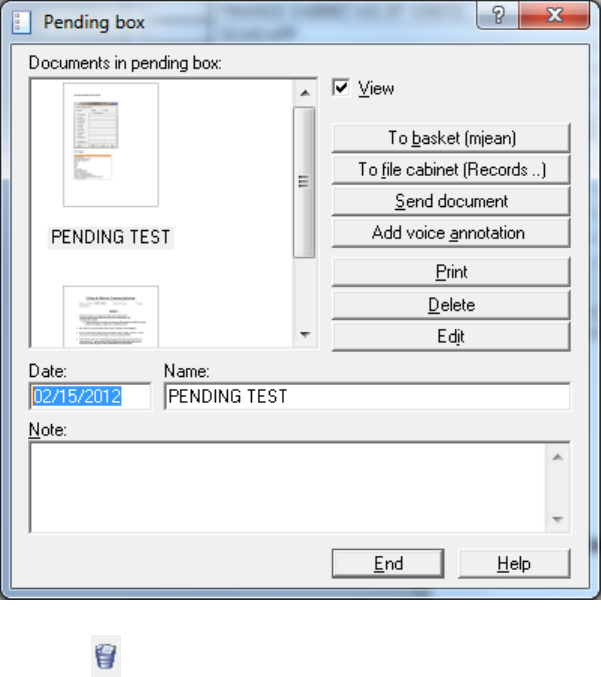
pending document, you must remember to manually delete the reference copy from you
Pending box.
• Trash can
Will show your trash can with all documents you’ve deleted from your basket.
Baskets
•
Think of DocuWare baskets just like normal office in -baskets found in an office environment.
Documents can be added and removed by selecting the entire basket’s contents or just a single
document at a time. You’ll see an image icon of a ‘stack of paper’ within your DocuWare basket
if it currently contains documents. Don’t rely on the size of the stack in the image icon to give
you any indication as to how many documents are contained in your basket. It’s just a visual
indication to the user that documents exist in a basket. The Search Dialogue for cabinets is not
available for baskets. Remember, unless someone else registers your basket, they will not be
able to see your documents. This is important to remember in case you aren’t in the office and
someone needs to see a particular document you may not have yet stored in the corresponding
file cabinet.
o Page count displayed at the bottom of an opened basket in DocuWare is where you can
see how many documents and pages are actually contained within the basket. To the
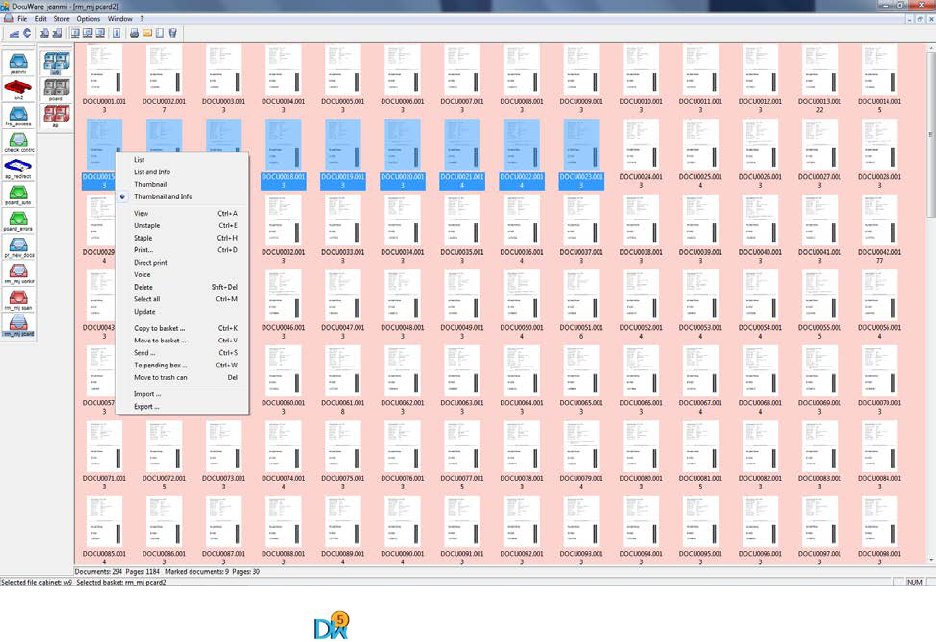
right of that number is another set of numbers that shows documents and pages
currently selected/highlighted within that basket. If you have PDF or Microsoft Office
native format documents in your basket, these will only show as 1 document and 1 page
although the document may actually contain multiple pages. (See ‘Understanding the
DocuWare Viewer’ below to learn how to navigate through pages of documents not
stored in DW Tiff format).
o Moving documents from basket to basket. You can select documents and drag them
from one basket to another (single or group of documents), or...
You can select documents to move and press Ctrl-V and then choose desired
destination basket to transfer the selected documents to.
Right-click for menu options on selected documents (Example shown below).
o A DW5 image icon appearing as a document in your basket usually indicates that
this document was moved by another user or the image file or file path is corrupt.
o Half-page or incomplete images of documents in your basket will give you an “image
could not be read” error message when trying to view the document. This will
sometimes occur if there is a hiccup in the transmission of a scanned document from
the scanner into DocuWare. If you see this icon, try right clicking and refreshing your
basket…it should disappear. If not, please contact COM-IT Records Management.
o Updating baskets- Refreshing your basket will allow you to see recently added
documents. Baskets that are Centrally Managed will automatically update for all users
when documents are added or removed. A centrally managed basket must be set up by
an Administrator.
o If you ever see that your basket is reporting that pages exist within, but you have no
documents in your basket, please notify COM-IT Records Management as this is caused
by corrupt files and needs to be removed manually by an Administrator on the server
side.
Storing documents
•
Permissions: You can store documents into your department’s file cabinet(s) as long as you’ve
been assigned WRITE permissions. These permissions are decided by your DocuWare project
sponsor, who is typically a Business Manager, Supervisor or Department Head.
• File Types:
o PDF: DocuWare can store a variety of file types. If your department relied on COM ITS
– Records Management to scan and store your files, your files are typically stored in PDF
format. PDF format is the most commonly accepted file type for long-term storage and
satisfies records management best practices for storing electronic documents. PDF is
also the preferred file type when sharing files, as they allow the recipient of a file a
globally recognized file type that is easy to open without needing special software to
view a file.
o TIFF: This file type is used for projects where we are able to take advantage of using
OCR (Optical Character Recognition) for scrapping information automatically from a
document and importing the information into fields within your DocuWare file cabinet.
This file type is also used for barcode recognition, which depending on the type of
scanning project, may be used to separate the documents during the scanning process
as well as providing a match code (embedded in the barcode) to reference an external
database (CSV file, Access database, etc.) and automatically pull in all associated data to
that match code. For example, many of you are familiar with the university’s P-Card
(purchasing card) process. The header sheet that you print out from UA Financials when
preparing to send your receipts to the Financial Service Office contains information that
uses OCR. The Transaction ID is automatically read from the header sheet during the
scanning process using OCR technology. This Trans ID# then references an external
report sent to the university by JP Morgan Chase and pulls in all associated information
related to your purchase (date, amount, cardholder name, etc.). This cuts down the
amount of time it takes to properly and accurately index data into your file cabinet fields
by which you can search by later.
o Microsoft Office: We call these files ‘Native Format’ files in regards to DocuWare.
When storing a native format document in DocuWare, you can later modify this
document by right-clicking the document in the Results List after it’s been stored into a
DocuWare file cabinet.
• Importing files for storage: There are a few different ways to import files into DocuWare for
storage.
o Dragging and Dropping: You can click on a document and drag it directly into a
DocuWare basket. Once in your basket, you can select the document and store it into
DocuWare.
o COM-ITS RM: If you’re having the Records Management team scan for you, we will
perform all scanning and storage for you.
o MFD (multi-functional device): A MFD is typically a copier/scanner such as a Xerox,
Ikon or Canon device, which can double as a departmental scanner. COM ITS-RM sets
this up for you should your department decide to use their MFD for daily scanning.
After the MFD is set up, you will be able to scan a document at your MFD and the
document will automatically land in a DocuWare basket where you can select and store
the document into your file cabinet.
o Desktop scanner: Desktop scanners allow you to scan documents at your desk. The
documents will land in a specified folder where you can select them and drag and drop
them into a DocuWare basket for storage.
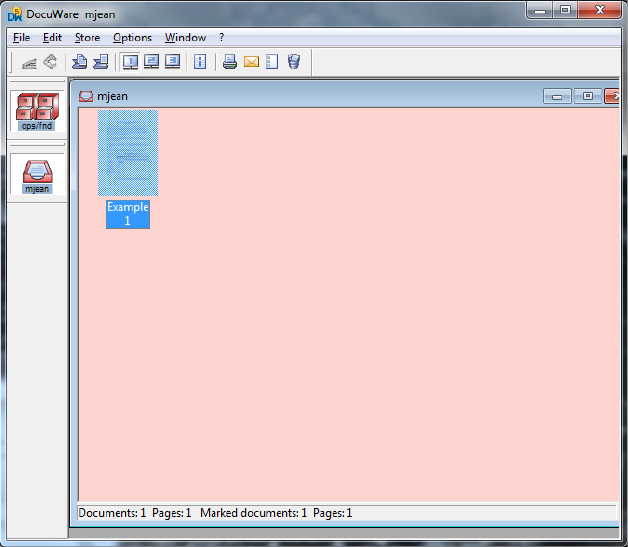
• Storing a document: To store a document it must first be imported into a DocuWare basket.
You then select the document so that it appears highlighted blue and select the file cabinet that
you wish to store the document into, which also must be selected (highlighted blue). Once both
the document(s) and the file cabinet are selected, you will then see the option to ‘Store’ show
up in the Menu Bar.
o Click on Store
An image of the document you are about to store will open alongside of the
Storage Dialog where you will key in the rest metadata to properly index the
document to be able to retrieve it later when performing a search for the
document. This is also the appropriate time to add text overlay notes,
electronic stamps or highlighting to the document (SEE
Understanding the
DocuWare Viewer for all options).
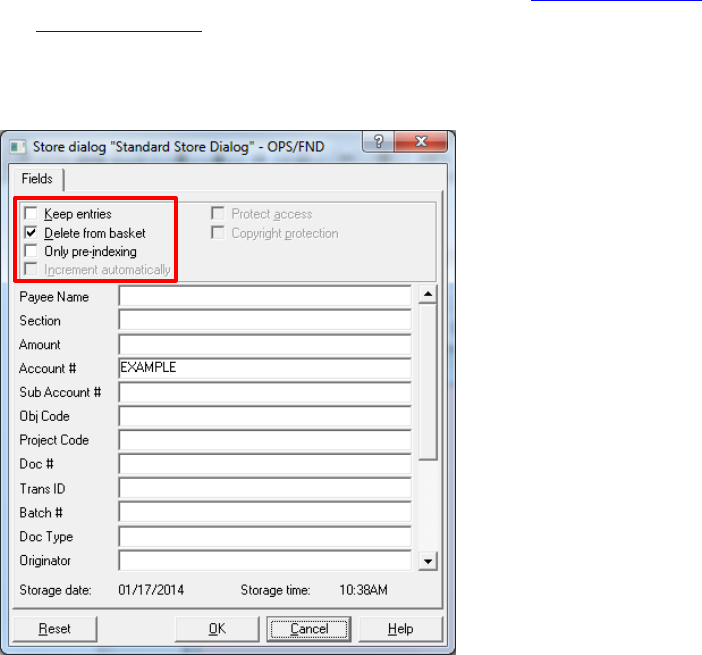
o Choose the desired indexing options
In the top of your Storage Dialog window you will find the following checkbox
options.
Keep entries
This option is used if many entries are the same. An example is records
with multiple documents for the same person or vendor. Using Keep
Entries, all the index fields become static entries (name, DOB, etc.) can
are kept between documents. Only the variable information needs to be
changed without re-keying the other information.
Delete from basket
When a document has been indexed with all required fields,
Clicking Ok or using Enter, the document will be stored instantly in the
file cabinet and deleted out of the basket.
Pros:
The documents are instantly available to the end user to look up.
Cons:
The ability to attach, skip, and delete at the time of indexing is not
available.
Only pre-indexing
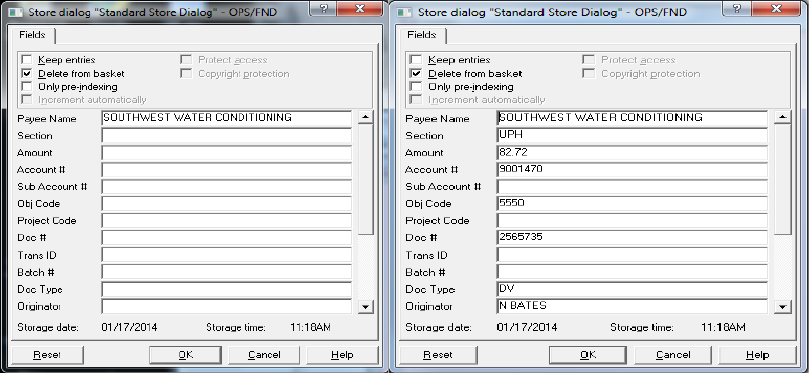
With this option the user has the ability to attach to, skip, and delete a
document while indexing multiple documents from a basket. Using
“Only pre-indexing” can be faster than moving the documents to the file
cabinet and then deleting them from the basket after every index. Only
pre-indexing quickly sends each document back to the basket for storing
an entire batch when indexing is complete. It also allows the user to
double-check their indexing before committing the document(s) to the
file cabinet.
After pre-indexing an entire batch of documents you can click on Edit in
the menu bar and choose the option of ‘Automatic Storage’. DocuWare
will then take all of your pre-indexed documents and store them
automatically into the selected file cabinet.
o Manual AUTOINDEX
This is a handy option for auto-populating indexing information on documents that
have related documents previously stored in the file cabinet. For our example, you
can enter the Payee Name and then right-click in the field after the name and
choose, Manual AUTOINDEX from the available options. The system will pull in all
information stored for this vendor previously. Keep in mind that you will need to
change all fields that may not relate to the document you are storing, but
information such as the account used to pay for this vendor will not need to be may
not need to be changed and can be kept.
Searching for documents
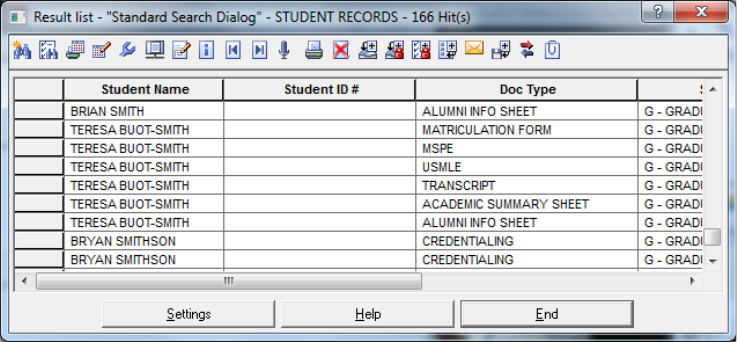
• There are many ways you can search for documents within DocuWare file cabinets. In COM we
rely on “key identifiers” (e.g. Student ID Number, Document number or Student Name).
o But, you can also perform searches by using different search options in combination to
narrow your search.
o You can also put in a date range, or a date range and any combination of search data for
a particular document to narrow down your returned results to a specific time period.
For example, if you wanted to see all invoices added to the file cabinet within the past
week, you could search the date range for that week to only bring back recently added
invoices in your Results List.
o Wildcards* are helpful when searching for DocuWare documents. You can enter an
*(asterisk) symbol before a last name and DocuWare will return all matching
possibilities in the Result List with any combination of first name/last name and/or any
names where the last name you entered is located somewhere in the last name. For
example, when we search for *Smith we will get hits like Bob Smith or Tim Blacksmith.
The same rule applies if you only know a first name. You’ll enter the first name
and then type in a * symbol after the name and DocuWare will return any
record containing that first name. For example, when we search for Anna* we
will get hits like Anna Smith or Annabel Wilson.
Wildcards can be placed on both sides of any search criteria resulting in a much
larger return of possible matches. For example, *Smith* will return any entries
containing Smith somewhere in the name (see example below).
After you enter your search criteria and click OK, the Result List will appear. This
is where you’ll see exact or near match results that you can choose from.
Creating Microsoft Excel reports with the Results List
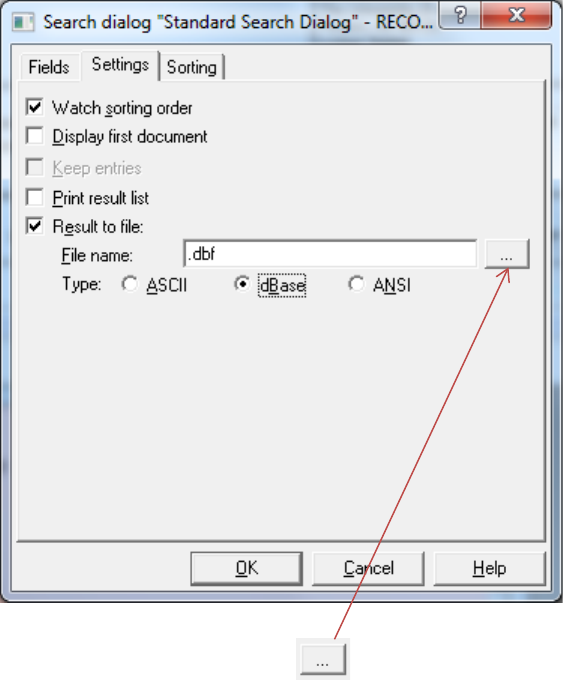
• In DocuWare you have the ability to create a database file of the Results List showing all content
of a particular file cabinet, which you can import to a Microsoft Excel document. To do so,
perform the following steps.
o Double-click the file cabinet and choose the Settings tab with the following options (see
below)
o Next, click on the browse button to select your file destination and name your
file.
o After storing your file and attempting to open it for the first time, you will need to
choose Microsoft Excel for your preferred program to open the file for it to display
correctly.
Understanding the Results List
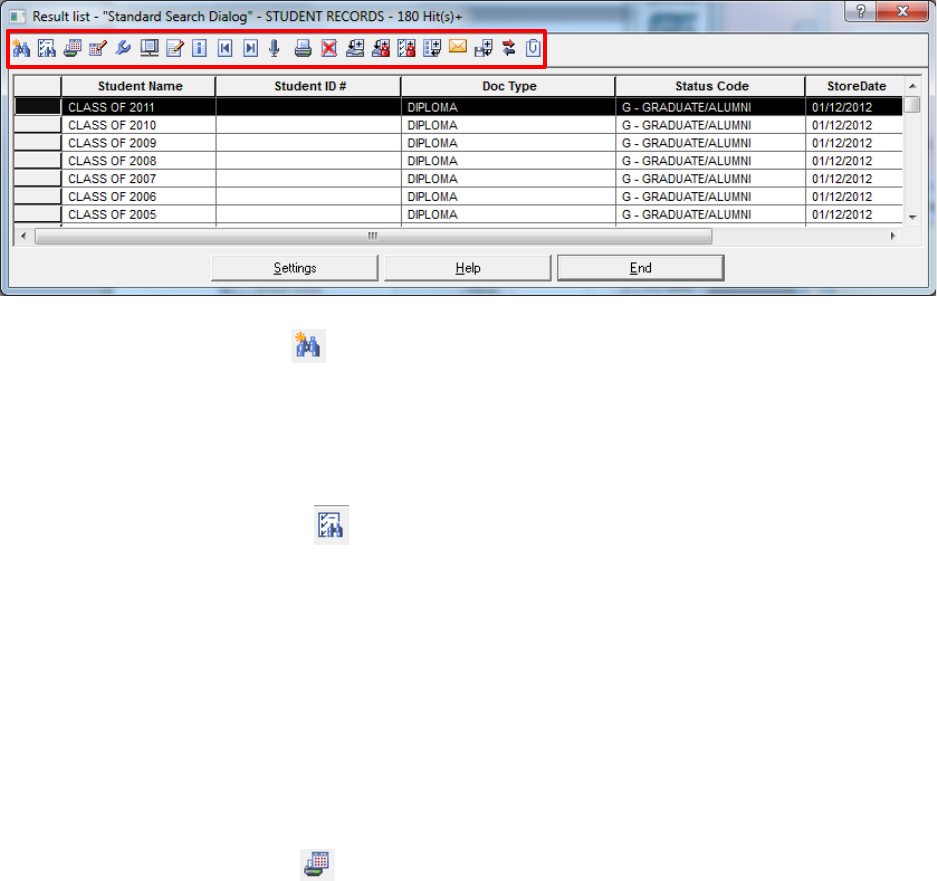
o New search
Start a new search. The entries you made in the database fields for the preceding search
remain intact. You can modify the entries as necessary without having to enter
everything all over again.
o Nested search
A nested search is a search that is not run across all documents in a file cabinet, but only
on those listed in the current result list displayed. This type of search is useful for
refining the search in order to narrow down what you are looking for specifically.
When you click the button, the empty search dialog opens in which you can enter the
additional search words. The system automatically links the new search words with
those of the initial search. You then receive the result list of the nested search. If you
click the Nested Search button again within this result list, the search dialog from which
you started the nested search is displayed once more containing your original entries.
o Print Results List
This is an option available to print the results list. The printed data will not look exactly
like the Results list, but will be in the same sequence of fields.

o Change field
This setting is typically reserved for DocuWare Admins. Change field allows you to
modify previously indexed metadata on documents from the results list. If you want to
edit one field entry for multiple documents, select the respective documents in the
result list and then click this button. The field entry can be changed in the dialog
window, ‘Modify field entries’. (This function is not available in the results list after a
search across multiple file cabinets).
If you want to edit multiple index fields, please repeat the described process for each of
these fields.
o Settings
This option allows you to change the way your Results List displays, but it’s
recommended to leave it set to default settings.
o Display Window
Allows you to open a display window of the document you currently have highlighted
within the Results List.
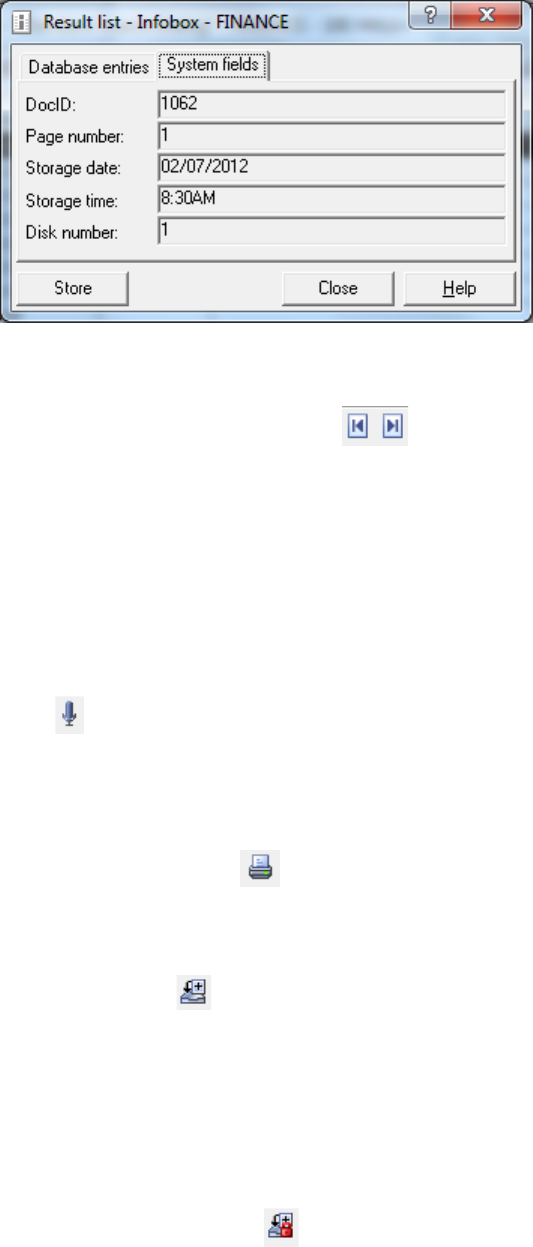
o InfoBox
If you want to edit database entries of one document from within the result list, select
the document in the result list and click on the button, Infobox. The dialog
window Result list-Info Box is opened. Then perform the modifications in the
tab Database entries. In order to save these changes, click on button Store.
The Systems Field tab allows you to see details about the document such as store date
and time.
o Display Previous/Next document
Using this option in the Results List will move your selection to the previous or next
document and open the document in the DocuWare Viewer window. You can also just
double-click on the document you want to view specifically. Documents stored as color,
grayscale may require a right-click to display them. Also, if you want to open a
Microsoft Office document in its native format to edit the document, you’ll need to
right-click it to make edits. If you simply want to view this document, you can just
double-click it.
o Voice
You have the ability to store voice annotations to a record in the file cabinet; however
we don’t use this option due to the size of the audio files.
o Print Selected Documents
This option will send the selected documents to your default printer.
o To Selected Basket
This option will take the selected document and drop a copy of it into your basket. This
is useful for modifying a document currently stored in the file cabinet. You can unstaple
the document and remove pages that may not be required. You will need to store the
document and request deletion of the version no longer required. Keep in mind that
this will change the actual store date.
o Checked Out documents
In DocuWare you can check out documents in file cabinets, so that they cannot be
modified by other users. This function is invoked in the result list via the Check-Out
button. The check-out function is designed as a version control mechanism. A document
has been changed and/or added to, and is stored as a new document in the file cabinet.
The old version is then retained as a back-up. Keep in mind that if you check-out and
check-in a document by storing it, the store date will change. It would be good practice
to place a note in the Text Annotation (stick pin) of the document noting the original
store date. This is especially important for any documents that require a hard copy
retention period. Documents that are currently checked out will have an “l” in the left
hand column of the results list indicating they are out. Only the user, who checked
them out, or an administrator, can unlock the documents.
If a user accesses a locked document, the following functions will not be available:
editing the document
adding another check-out
updating of protocol fields
The following functions will still be available:
displaying the document in the viewing program
printing
migration to a different file cabinet
copying to a basket
exporting to another file cabinet
o Show/Hide checked-out documents
Click this button to see all checked out documents (indicated by “l”).
o To Pending Box
This option is not recommended.
o Send…
This option allows you to send the currently selected document via email in Microsoft
Outlook . It will send the entire document from the Results List. If you want to just send
a particular page of the document, open the document in the DocuWare Viewer and
select . Next to the envelop icon you’ll see a drop-down menu where you can select
‘send current page’.

The document will attach to the email in the format it was stored. Many of the
documents that will be stored will be in Tiff format (.tif). If you want to send the
document as a PDF, open the DocuWare Web Client and send it from there. All
documents are uploaded in PDF format using the Web Client.
o Export
Just as it is possible to import documents (files), you can also export documents from a
basket to other directories, to other hard disks or other storage media.
Mark the file that you want to export, then from the main menu click File then Export...
.The dialog window Export will be opened.
The dialog window has the following structure:
Export to directory
Here you specify the directory to which the files are to be exported. To do so, either
move the cursor into the box and make your specifications, or click on the browse for
folder button and select the desired directory in the folder-select box.
Use original file names
If you activate this option, files that DocuWare has already imported but not converted
will be exported with the names the original files had before they were imported.
o To Other File Cabinet
This option will allow you to move a copy of the selected document into another
DocuWare file cabinet for storage. Keep in mind that you’ll need to go into the cabinet
that has received the document to modify the index field entries if this cabinet’s index
field structure is not identical to the file cabinet you sent it from.
o Append
This option allows you to append a document that is in your basket to the document
you currently have selected in the Results List. For example, if you want to append a
follow up email to a particular record you would print the email to Tiffmaker5. This will
place a copy of the email in your DocuWare user name basket. From here, you can call
up the record in the Results List; select the email in your basket; click the append icon
and the email will be attached to the end of the document/record. Then, open the
document and place an electronic ‘Append’ stamp on the email portion of it to indicate
that these pages have been appended.
Understanding the DocuWare Viewer
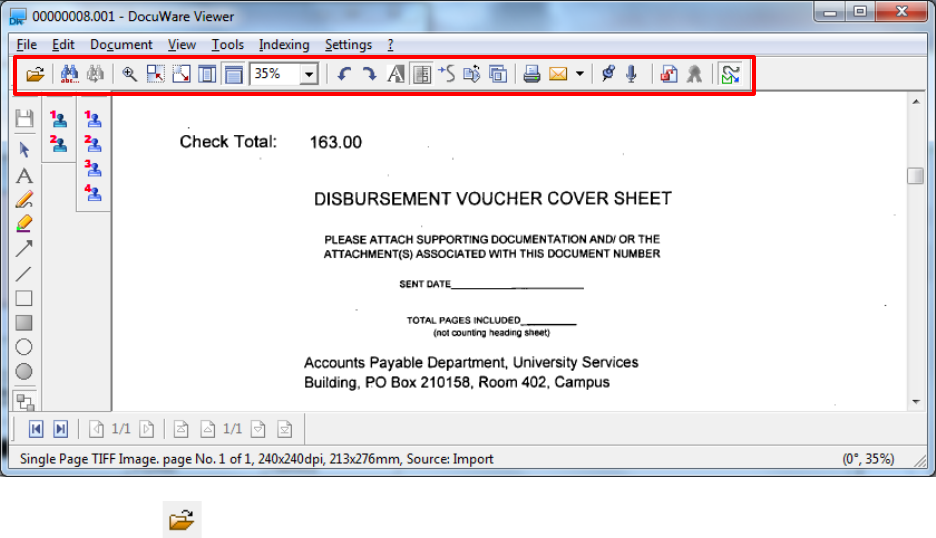
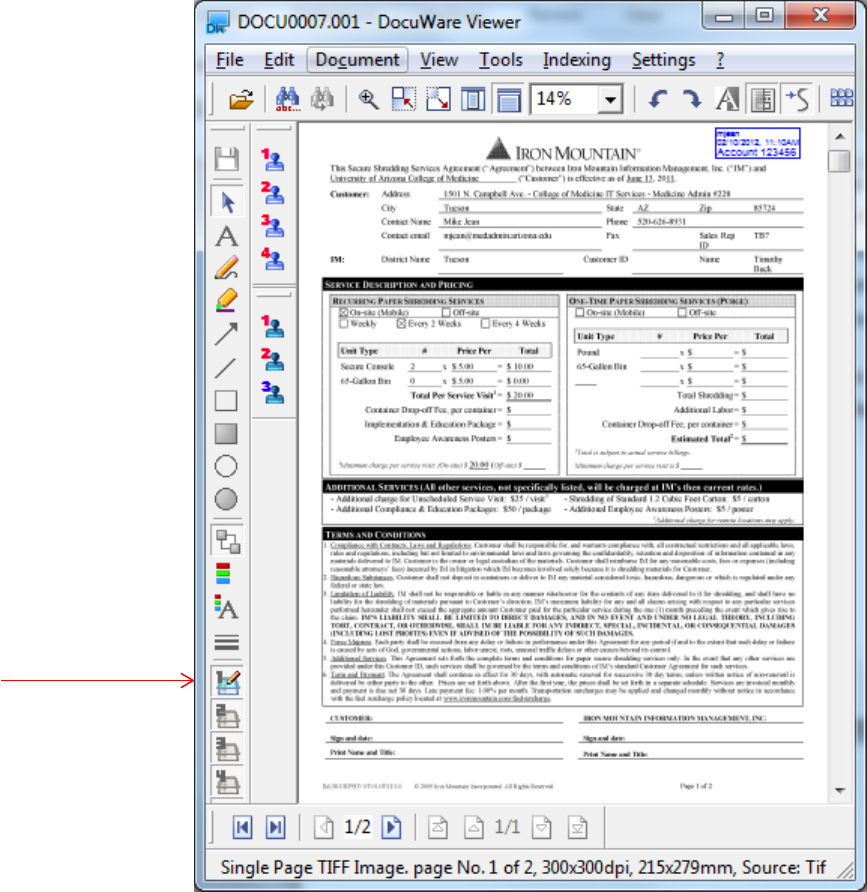
When you open a DocuWare document the image will appear in the DocuWare Viewer as seen in the
example below. Located in the toolbar of the viewer are a variety of tools to assist you in reviewing
documents. Listed below are the tools that we’ll cover.
• Open
This function will not be used.
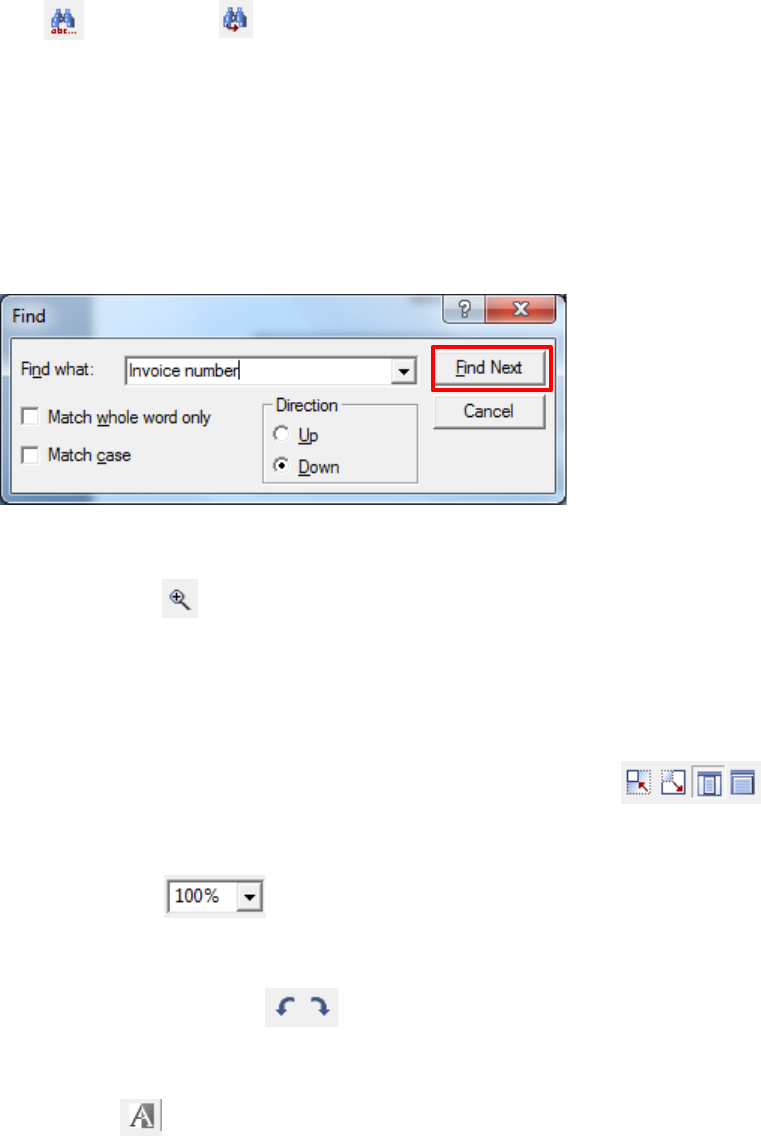
• Find and Find Next
Within the viewer you have the capability to perform a text specific search. This will allow
you to enter keywords you might be looking for on a document such as ‘invoice number’.
After you enter your search criteria the full text search function of this tool will highlight all
matching information.
‘Find Next’ will locate the next instance of the word you are searching for and highlight it.
Or you can just click on the Find Next button in the Find window as shown below.
• Zoom in segment
By selecting this tool you will be able to zoom in on a specific area of a document by clicking
this icon and then clicking-and-dragging a box around the information you would like to
magnify. You can also use the first two icons shown below.
• Zoom Out, Zoom In, Display Complete Page, and Display Full Width.
All of these tools will allow you to modify your viewer display while reviewing a document.
• Zoom Percentage
Magnification percentage for zooming in/out on an image.
• Rotate Left and Rotate Right
This tool will allow you to turn the document in the DocuWare Viewer.
• Invert Image
This tool will invert the image, changing black to white and white to black. You probably
won’t use this option much, but it’s nice to have when you can’t make out what a particular
word says.
• Display Improvement
This tool will sharpen the text on a scanned image where the letters may appear to be a bit
fuzzy.
• Line enhancement
This tool should enhance text where the letters are a bit choppy, although you probably
won’t see much improvement.
• View All Pages of the Document
This tool will allow you to view a multi-page document in thumbnail view in the DocuWare
Viewer. This is helpful when you are looking for a specific page of a document without
having to page through to find it. Once you find the page you are looking for, you can
double-click the thumbnail to expand the document to the entire window of the viewer.
• De-skew
De-skew allows you straighten up the orientation of a document in the DocuWare Viewer.
This option won’t be used much unless you are scanning your own records and your scanner
has the tendency to pull in paper crooked.
• Create a copy of this window containing current document
This tool is handy if you want to look at 2 different pages of the same document at the same
time in separate viewers.
• Print
Print the document to your default printer.
• Mail
This tool will attach either the current page or the entire document to a new outgoing email
message in Microsoft Outlook. Use the drop-down menu to view your choices.
• Text Annotation
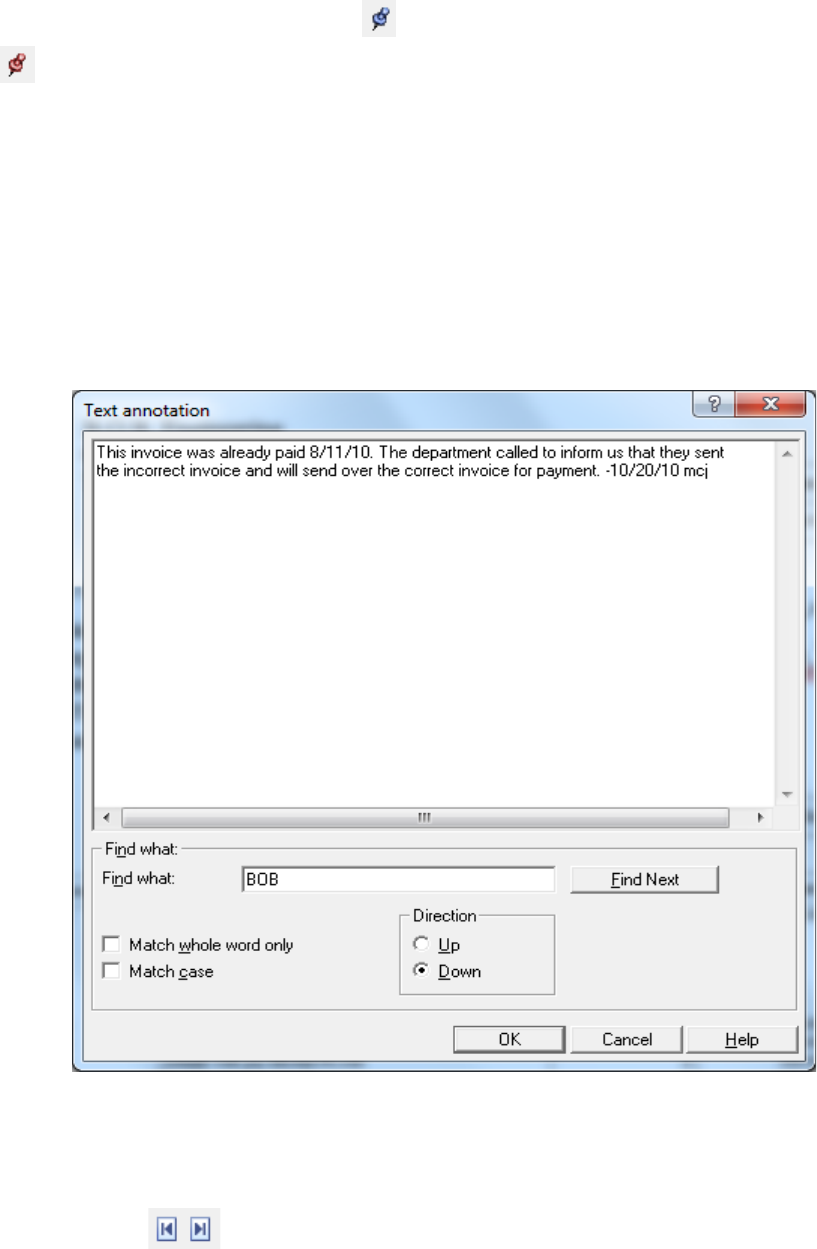
This tool is commonly referred to as ‘Stick Pin Notes’. If there aren’t any notes on a
document, the stick pin will appear blue . If there are notes, the stick pin will appear red
. Notes on a document should always be placed on the first page of the document due
to the ability to add notes to each page. Keeping them on the first page provides a visual
reminder that notes exist on the document. Below you will see the uses of stick pin notes.
Stick pin notes should be used to notate all correspondence regarding the
related record.
This area should be used to place all notes and information required to
process a document.
It’s important that you place your initials and the entry date on every entry
in the notes so we can track the audit history on the document.
IMPORTANT: Never erase entries within the stick pin notes.
At the bottom of the DocuWare Viewer you will find your Next Document and Page Forward by
One Page tools.
• Next Document
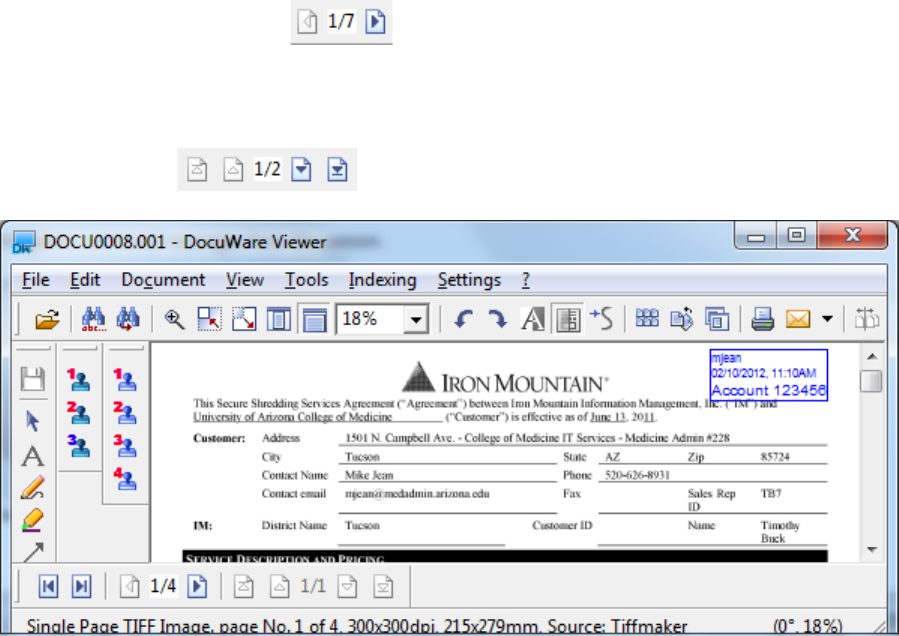
This tool is used to display the next document in the Results List or your DocuWare basket.
• Page Forward by One Page
This tool is used to page-forward on multiple page documents (Tiff format only).
Documents that are in PDF, Grayscale or Color will require you to use the following to
change pages…
• Additional Tools in the DocuWare Viewer
On the left side of the DocuWare Viewer you will find drawing tools, stamps, and overlay levels.
Depending on your preference, you can move the drawing toolbar to top, bottom or left on the
DocuWare Viewer.

• Stamps
We use a variety of electronic stamps to indicate actions performed on a document such as Faxed,
Emailed, Approved, etc. Placing stamps on documents is an important manual step that
demonstrates to auditors our strong internal controls and compliance. Your office can decide on
what stamps will be used to indicate actions on a document.

You are allowed up to 9 personal stamps that you can create. Personal stamps are only available to
the individual who created them.
There are also 9 Public Stamps available, although these are created by the DocuWare Administrator
(COM- IT Records Management). These stamps will consist of the most commonly used stamps
across the organization such as Append, Fax, Copy, etc.
If you hover your cursor over a stamp, you will be able to see the name of the stamp. To place the
stamp, click on it to bring up the stamp and place it in a desired location on the document. Once
you save the document, the stamp will not be able to be moved on the overlay level that’s active.
o Stamps can also be customized to change index fields (indices) when placed on a
document to assist with workflow.
o Since a stamp is set on an annotation layer (overlay), the desired layer must first be
activated (See Activate/De-activate Level below). After this, click on one of the stamp
icons to invoke the stamp function.
Clicking on the stamp you want to add to a document will activate the
placement of the stamp. Drag the stamp to the desired location and left-click to
finalize the placement. The stamp is then set or, depending on the stamp
setting, you will be asked for your password or prompted to enter information
in the stamp.
o All pages appended to an existing DocuWare document should have each page stamped
with the APPEND stamp in any open space at the top of the page.
COM-IT Records Management stores the appended hard copy portion of the
document separate from the source document.
By being able to refer to the Append stamp we are able to know who appended
the document and the date and time the action was performed. This
information allows us to locate the hard copy if required.
Other common stamps you’ll encounter are the FAX (mentioned above) and
EMAIL stamps used to indicate how documents have been received in the
College of Medicine.
Creating Private Stamps – stamps created by and available to individual
users who created the stamp.
Public Stamp Definitions – stamps created by an Administrator and
assigned to a group of users.
• Store Annotation
When clicked, this option will store any annotations you make to a document. If you close
the viewer after adding annotations and do not click on the disc icon, you will be prompted
asking you if you want to save the changes you made to the document. You can click the
save disc icon or save your changes when prompted.

• Select Drawing Object
The cursor icon allows you to select any annotations or stamps you’ve added to a document
and move them to a more desirable location on the document. For example, when you click
on a stamp that you want to move, a checkered border will appear around the
stamp/annotation to signal it’s ready to be moved. You can then drag it to your desired
location. Once you save the document, the stamp’s location cannot be altered at a later
time.
• Write Text Overlay
This is the option you’ll use to add a text overlay on the document. This is helpful for adding
notes right on top of the image of the document that you want to stand out and others to
see upon opening the document.
• Draw Freehand Line
This tool allows you to draw freehand lines on the document. You probably won’t use this
tool much unless you identify a use for it.
• Highlight with a marker
You can use this tool to highlight text on a document. I recommend using the Transparent /
Non-Transparent objects tool instead due to its precision (see below). Using the marker is
like drawing freehand.

• Draw Arrows
This tool can be used to point out something you want to draw attention to such as an
amount.
• Draw Line
This tool probably won’t be used.
• Draw Rectangle
This tool can be used to draw a border around text or an object on a document.
• Draw Filled Rectangle
This tool can be used to cover text on a document with a rectangle box with the color of
your choice, although it is only an overlay and the overlay level may be turned off if desired.
We’ll cover overlay levels below.
• Draw Circle Line and Draw Filled Circle
These tools have the same functionality as the rectangles described above, but use circles
instead.
• Transparent / Non-Transparent objects
This tool is used for highlighting text or objects. You can use any color in the Select Color
pallet that we’ll cover below.
• Select Color
This is where you can select the color of the lines, shapes, and highlights.

• Select Font
This is where you can select the font, font size and color of your font for text annotations.
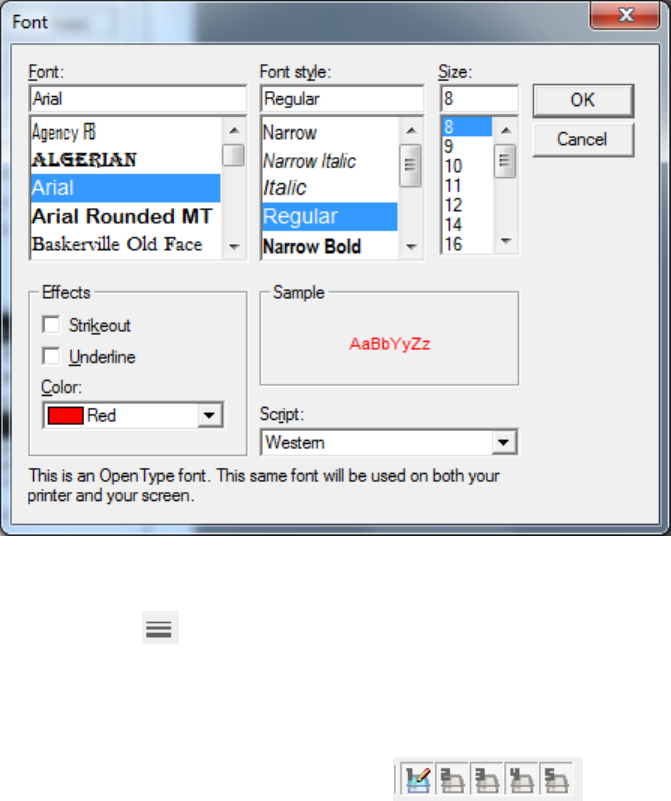
• Select Line Size
This tool is used to select the size of the line you may desire if you use the tool, Draw Line
covered above.
• Activate/De-activate Level (Overlay Levels)
There are 5 levels of overlay available on any DocuWare image file. The active level is
indicated by an icon of a pencil. Generally speaking, we typically only use Overlay Level 1 for
stamps and annotations. You may find that using all 5 levels is desired for a particular office
or business process. For example, a Reviewer might use Level 1 for their notes and an
Approver may always use Level 2 for their notes.
If for some reason you feel a document that you are viewing should have annotations or
stamps, but you don’t see them, ensure that your overlay levels are activated (see below).
Shortcut keys
•
Shortcuts can be found in the menu drop down lists next to function you are looking to learn
shortcuts for.
Some other helpful shortcuts are….
o Lighten and darken the text on a DocuWare black and white tiff image. Using your
number keys 1-8 you can temporarily adjust the setting on an image with 1 being the
lightest and 8 being the darkest. This option is not available for documents stored in
their native Microsoft office format or documents stored in color or grayscale format.
o Typing X in the search dialog field, ‘Store Date’, for any DocuWare file cabinet will auto-
populate that field with today’s date. Pressing the TAB KEY will carry over the current

date to create a search range to limit your current search to the specified date range.
Use the + or – key to increase or decrease the search range.
DocuWare Web Client
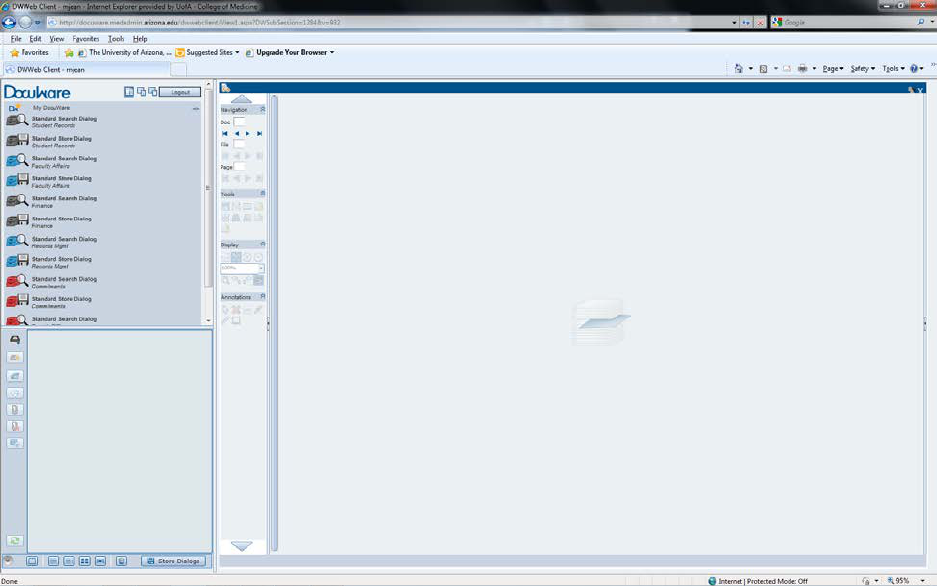
• https://docuware.medadmin.arizona.edu/dwwebclient
• The Web Client has all the functionality of the Windows Client. It can be accessed anytime
within the Medadmin domain (at work). It can also be used outside of work to allow you to
access your records. This is nice feature if you plan to work from home or if you’re on a business
trip. If you plan to use the Web Client outside of work, you’ll need to make sure your device is
set up for VPN access to the College of Medicine domain (please visit the Help Desk for
assistance). You can access the Web Client by entering your user name and password that you
use to log onto your computer every morning.
• The most useful feature of the Web Client is having the ability to send a TIFF format documents
as an email attachment in PDF format. This means that any document that may have been
scanned or imported into DocuWare as a TIFF documents will instantly covert to PDF format for
easy view ability by your email recipient. Any document stored in its native format within a
DocuWare file cabinet, such as Microsoft Office documents, will automatically import into your
email attachment in its native format when using the Windows Client.
Last revision: 04/25/13 mcj
